 3
3

해킨EFI  [Catalina 10.15.6 + OC r0.6.3] GA-B250M-DS3H, i3 - 7100, HD 630, Mac OS Catalina 10.15.6 업데이트 설치 후기
-
 shl628 https://x86.co.kr/@shl628
 - 4698
- 32
shl628님의 기기정보
★ shl628's Custom Mac :D ♬
CPU : Intel 7th Gen Kaby Lake Core i3-7100 3.90 GHz
MainBoard : Gigabyte GA-B250M-DS3H
Graphics : Intel HD Graphics 630
Memory : DDR4 PC4-19200 2400 MHz 4GB x2
SSD : Samsung 870 EVO SSD 250 GB
Sound : Realtek HD Audio ALC 887
Ethernet : Realtek PCIe GBE Family Controller
Wi-Fi & Bluetooth : Intel Wi-Fi 6E AX210 160MHz
| 시스템 사양 선택 | 1번 |
|---|


 shl628 | 2020.07.21
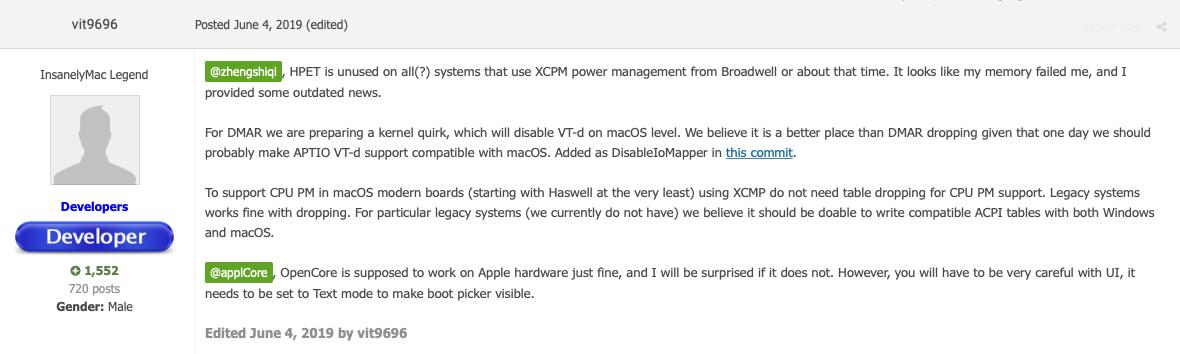


shl628님의 최근 게시물
shl628님의 새글 알림을 받으실려면 구독
shl628


댓글 32
참여를 하시면 세상을 바꿉니다.
shl628 글쓴이
2020.08.17. 22:39
|댓주소:#5192197

shl628

shl628
ws
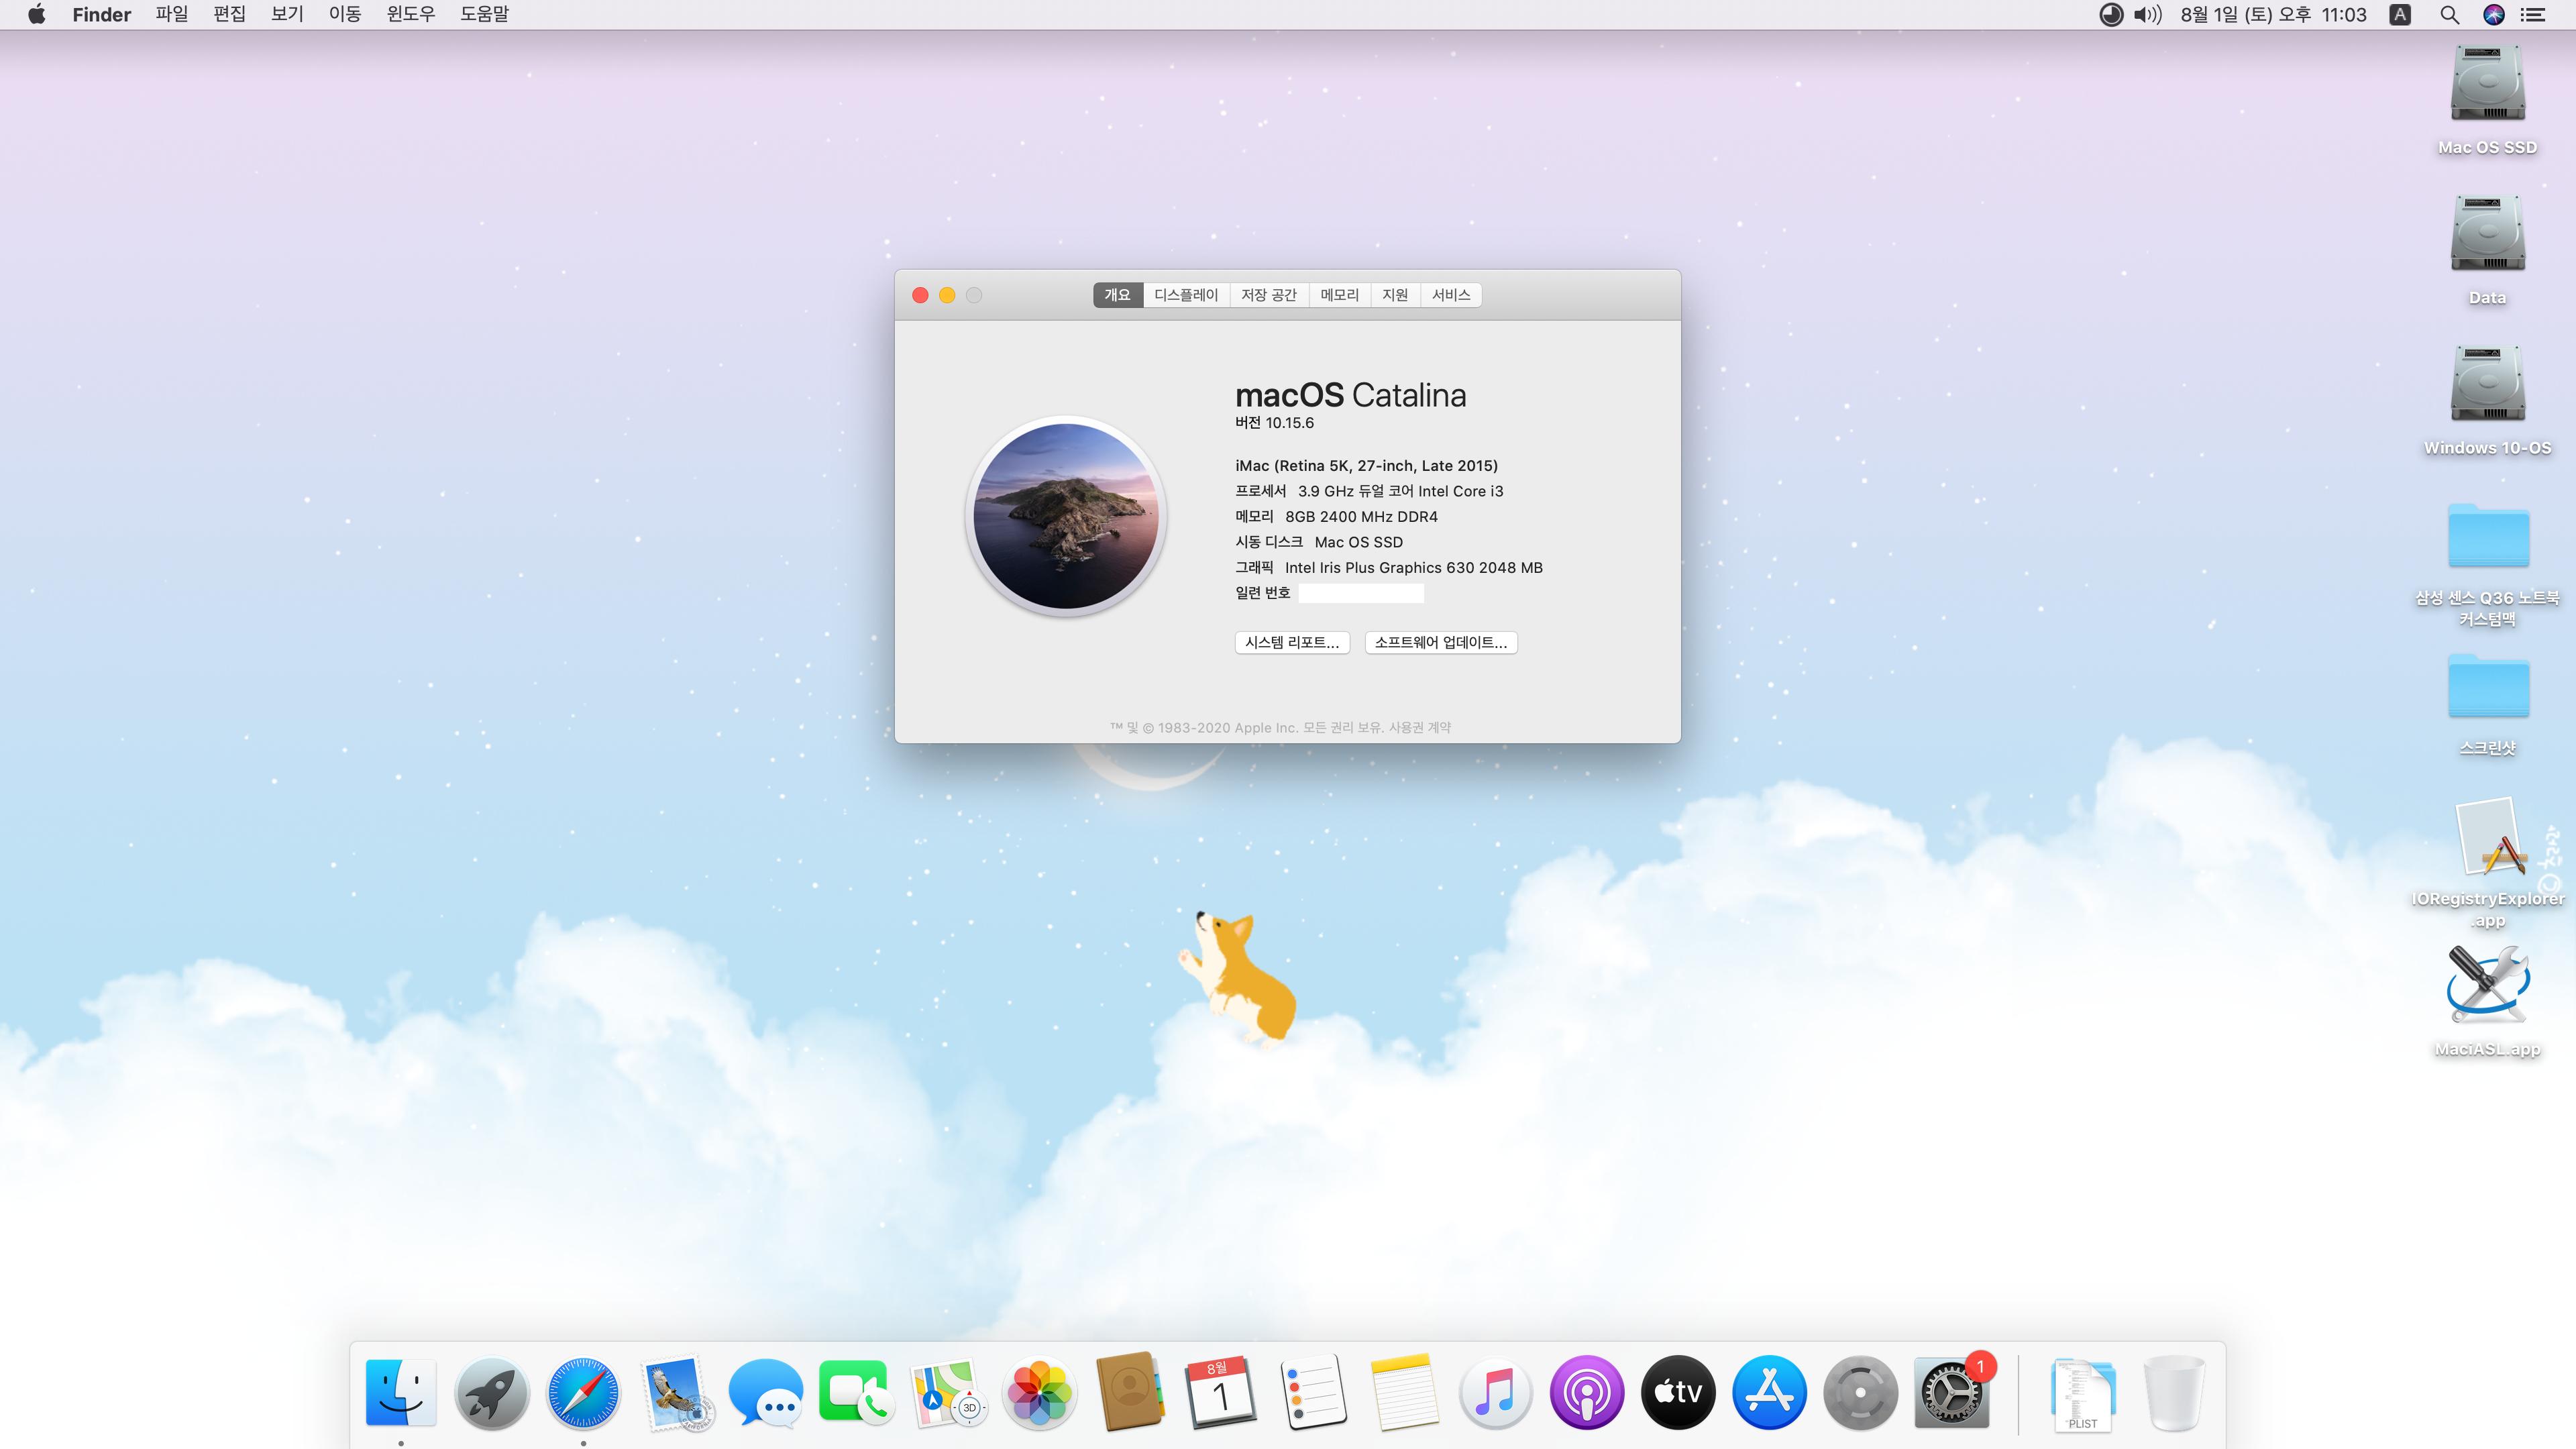
A1 : 원래 Intel HD Graphics 630 으로 표시되는 것이 맞지만 Properties 의 Model 속성을 수정하여
Intel Iris Plus Graphics 630 으로 표시되도록 단순히 Cosmetic 을 적용한 것입니다.
A2 : EFI 폴더에서 일부 Kext 와 Config.plist 를 적합하게 수정할 필요가 있습니다.
Clover 의 EFI 폴더를 사용할 경우에는 DSDT.aml 을 삭제하고 사용해주세요.
Dokdo
OEM DSDT 의 내용이 메인보드의 모델마다 다르기 때문에
완전히 동일한 메인보드를 사용하는 것이 아니라면 DSDT.aml 을 삭제하고 사용해야 합니다.
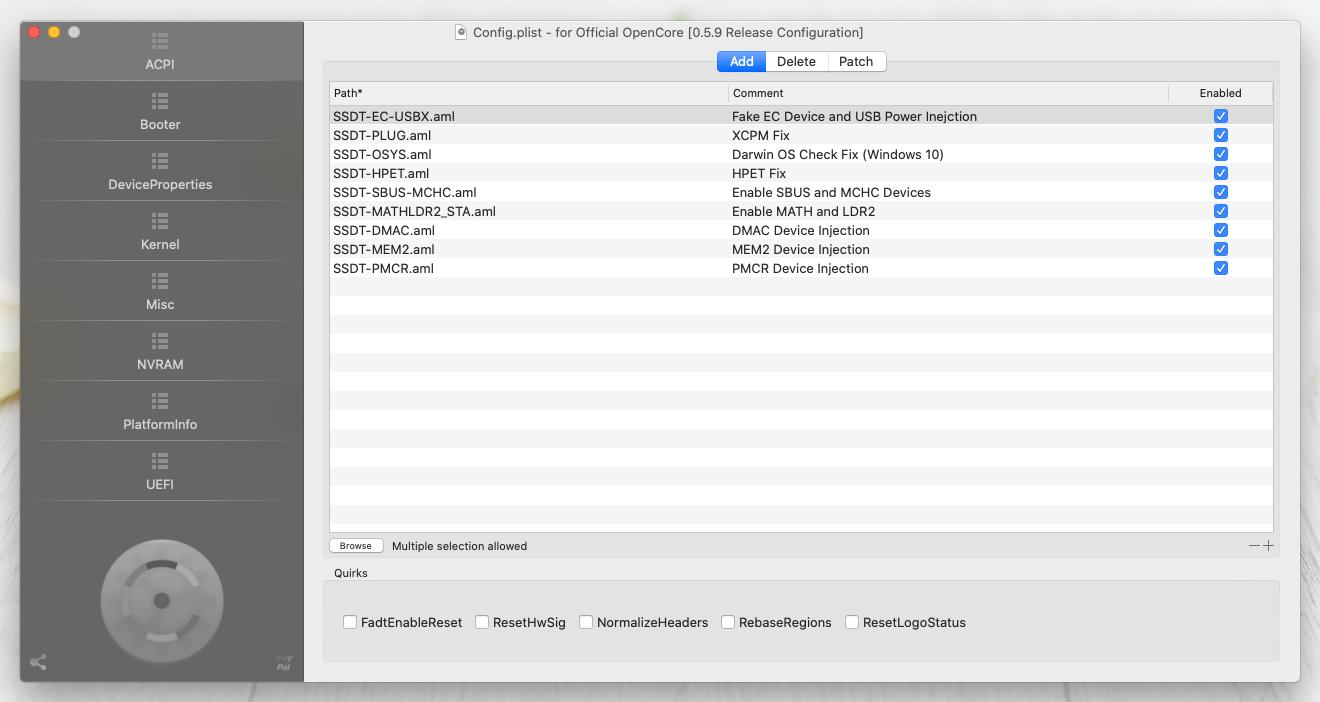
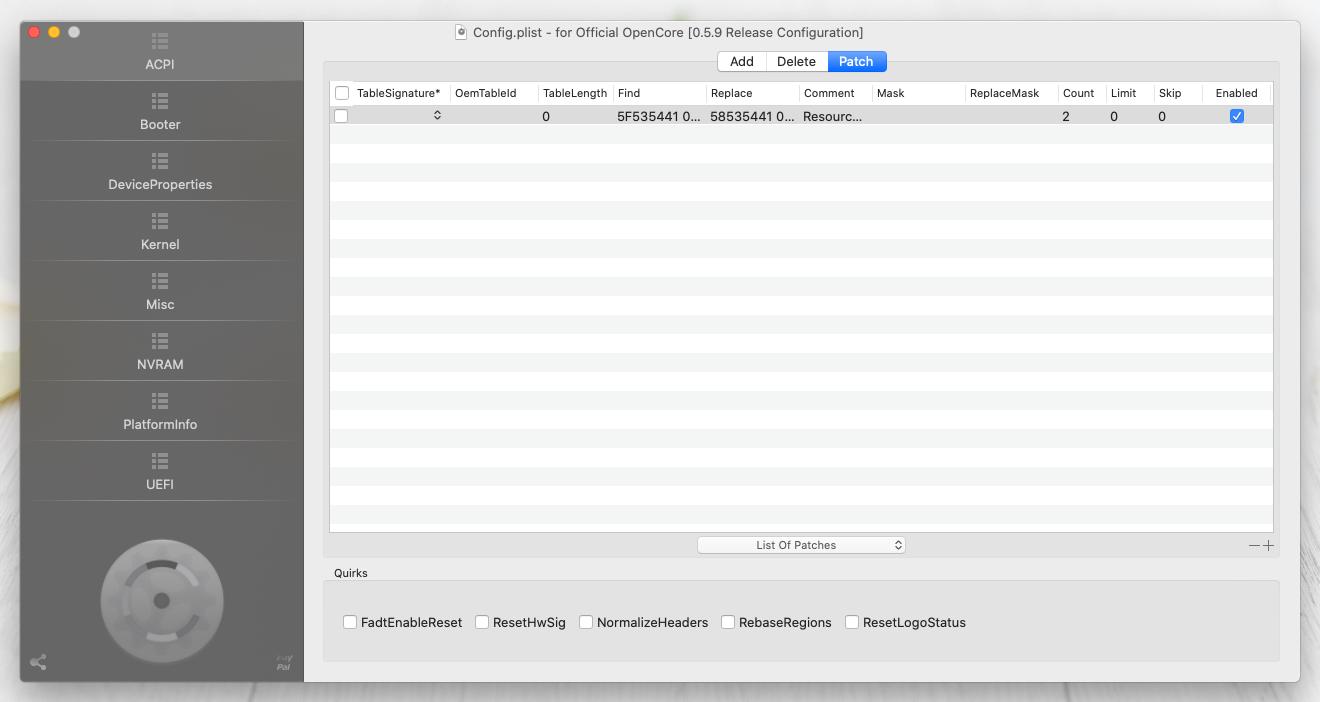
하지만, OpenCore 의 EFI 폴더에 포함되어 있는 SSDT 는 SSDT-MATHLDR2_STA.aml 을 제외하고
거의 Injection 방식의 ACPI 패치라서 그대로 사용할 수 있습니다.
SSDT-MATHLDR2_STA.aml 는 OEM DSDT 에서 MATH 와 LDR2 라는 Device 가 존재하는지 확인하고
MATH 와 LDR2 라는 Device 가 존재한다면 ACPI Rename 패치와 같이 적용하면 됩니다.
그런데, 아마 Gigabyte 의 GA-H110M-H 메인보드에도 9개의 SSDT 모두 사용할 수 있을 거예요.
shl628
안녕하세요, 저는 중국에서 왔습니다
I am from China. We recently learned that someone in South Korea has successfully driven a graphics card in ice lake, and we want to ask for help.
https://x86.co.kr/mymac/4919509
After we learned of his situation, we tried to reproduce it, but failed. Now think about you for help, hope you can help me!
I will attach my latest efi and my ACPI table!
Equipment: yoga s740 (China version)
Graphics: Iris Plus940
CPU: i7 1065G7
SSD: WD Blue SN550 NVMe SSD 1T (after pm981a replacement)
Sound card: ALC285 and inter sst mic
Memory: ddr4x 3733 16G (micron)
BIOS: BYCN35WW
CFG lock: Disabled (changed)
DVMT: 64M (changed)
앤드류우
I tried editing your EFI folder.
Replace it with the EFI folder below and reboot.
- Injected additional properties for Intel integrated graphics.
- Adjusted some Kext loading order.
shl628
When I start it up, it reports an error like this
Then I found that the "device-id" of the device must be set correctly to take effect, such as <8a520000>. Even if the setting is correct, the system can be entered without adding the platform id!
When I cha
nged the "528a0000" of the device-id to "8a520000" on the basis of what you posted, the change occurred.like this
I don’t know if the video can be played, so I compress it and upload it.
B5538FA0F7E70B8358D06FAC50910397.zip
The following is a screenshot of the video. 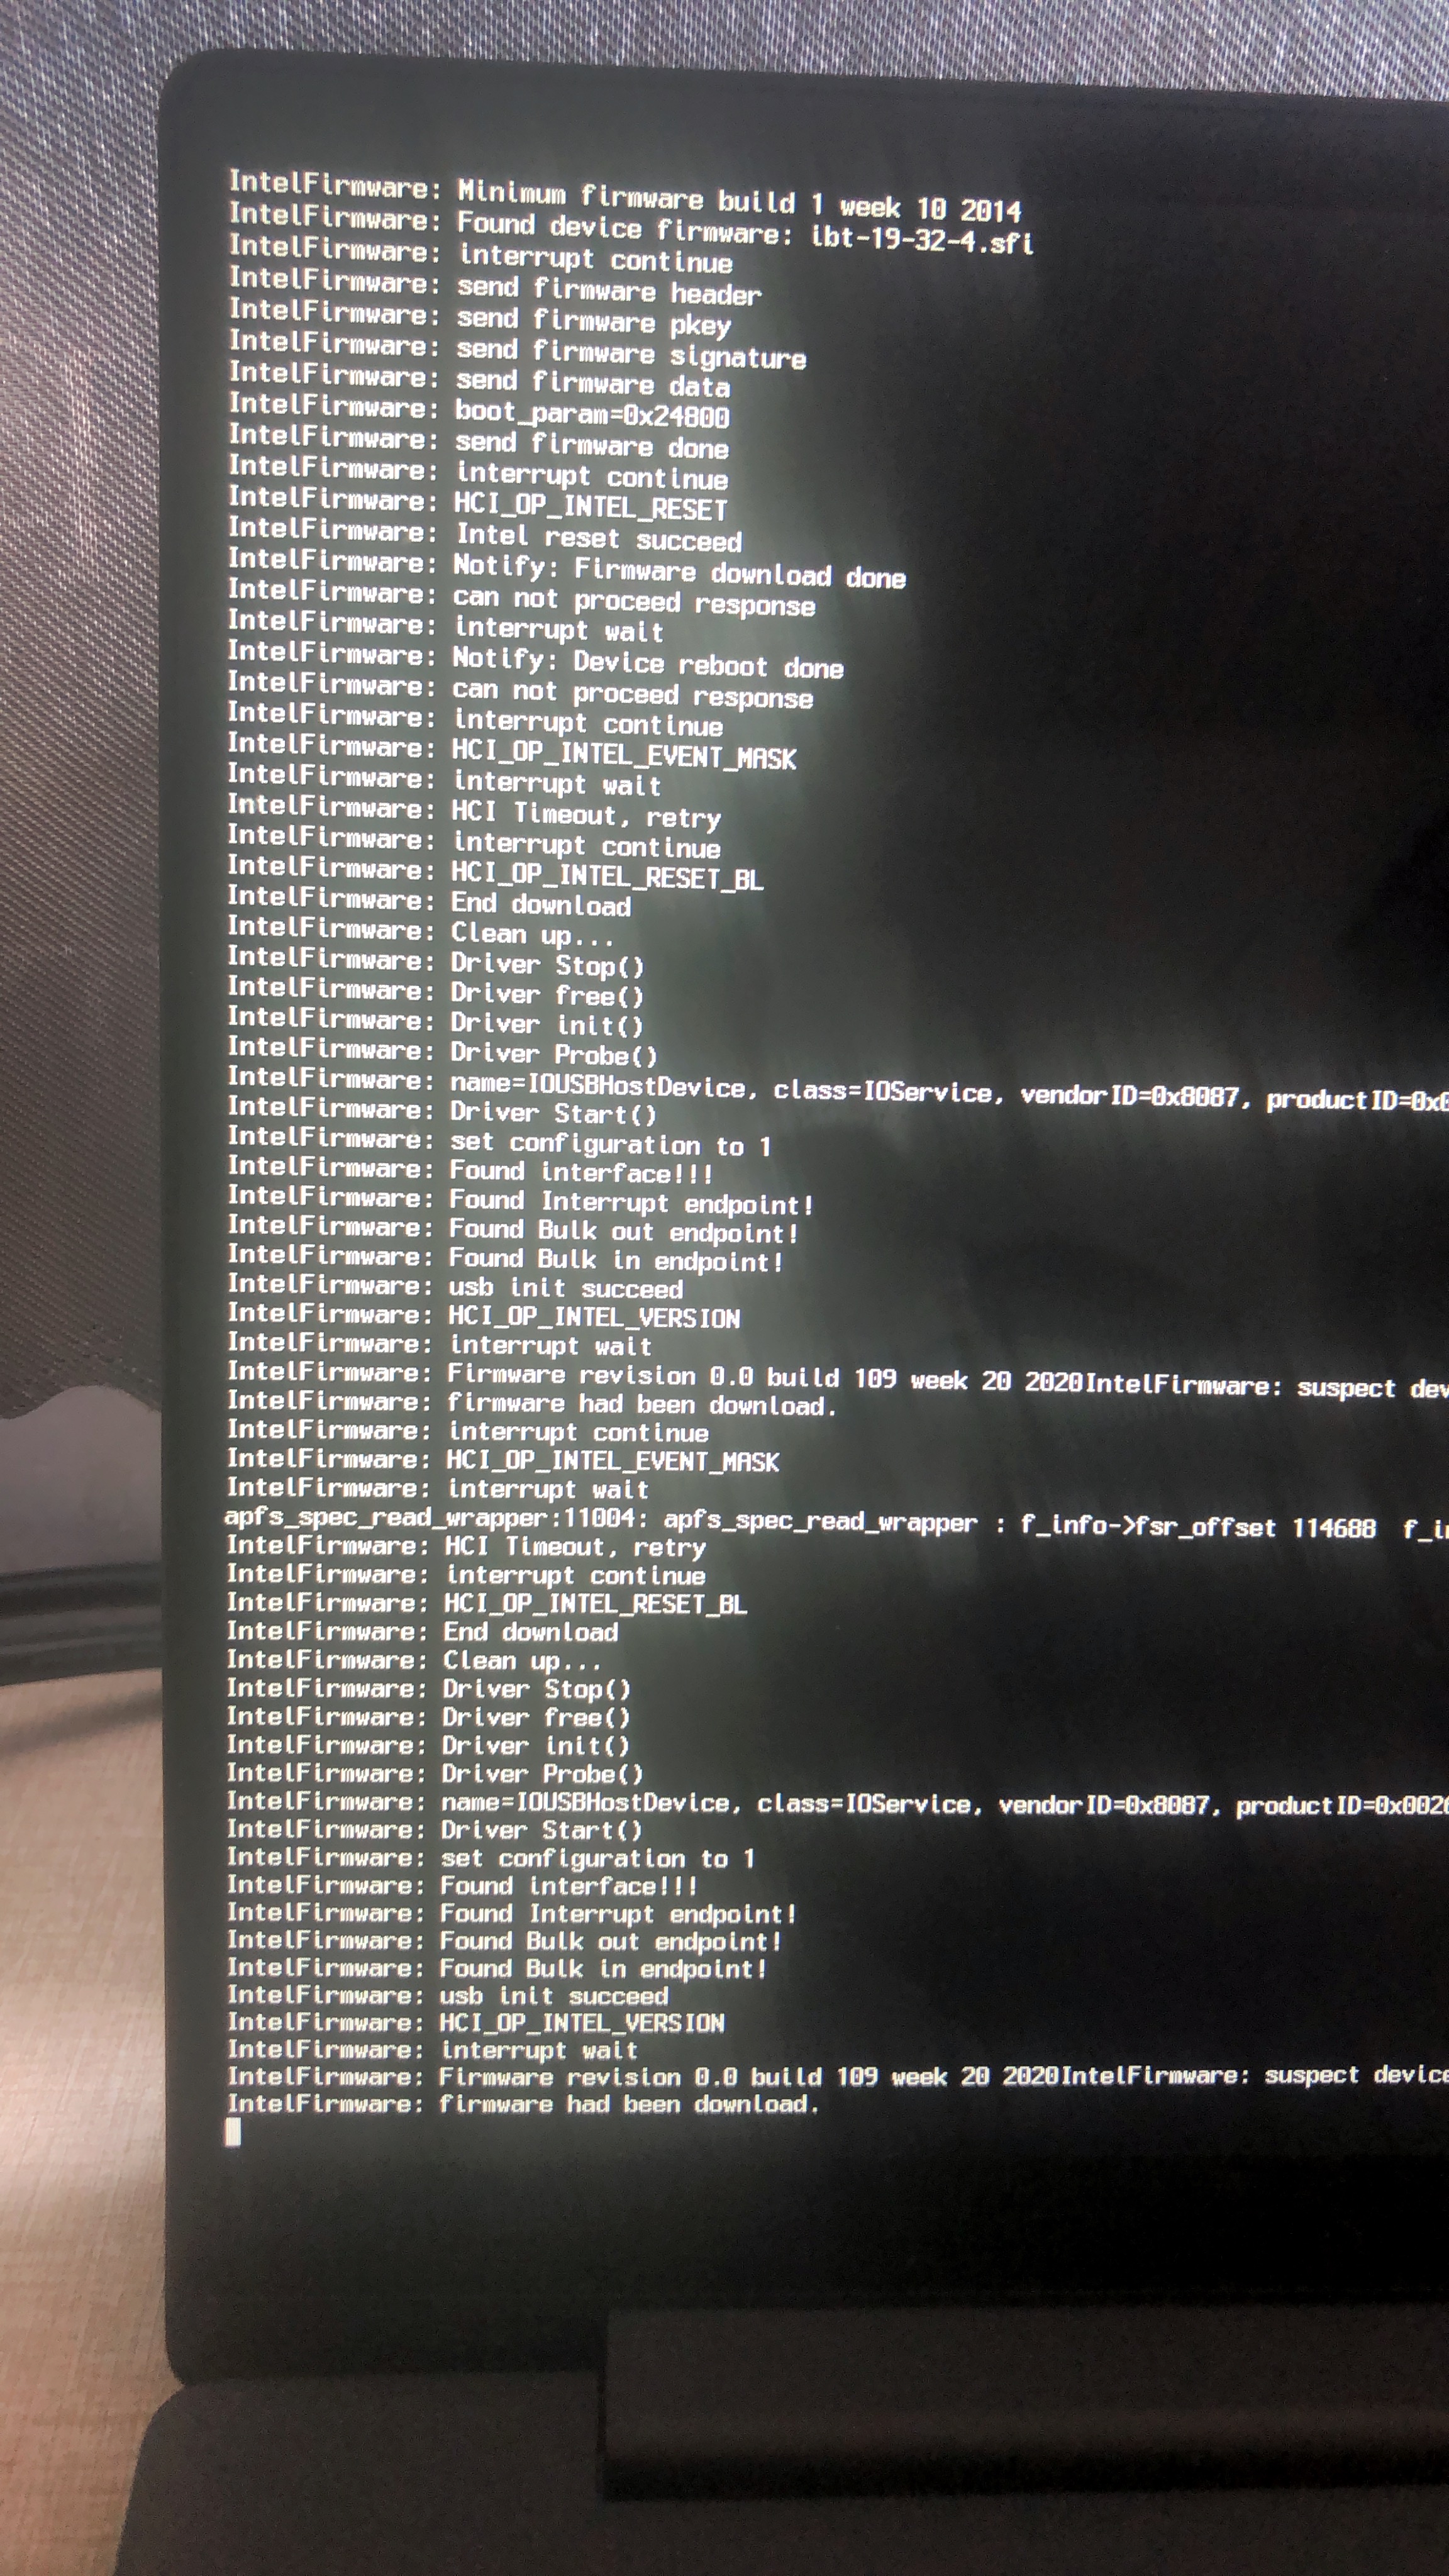
The situation is that when I plug in the power, there is a power prompt. Does this indicate that it is turned on? Or there is a driving situation, I don't understand!
The current situation is that whatevergreem has not been updated yet, so ice lake seems to have no way to drive it.
buthttps://x86.co.kr/@KhoraLee
seems to drive it correctly, but I can’t contact him.
They said I can ask you for advice, so I want to ask for your help
앤드류우
Um... I may be wrong, but I think the problem of not enabling QE/CI graphics acceleration is related to DVMT.
AppleIntelICLLPGraphicsFramebuffer.kext has a lot of changes.
In particular, one of the changes is that Stolen Memory requires slightly more capacity than the previous ~ SKL/KBL/CFL Framebuffer.
And, in the process of enabling QE/CI graphics acceleration of Intel integrated graphics, it is important to set DVMT Pre Allocated Memory to 64 MB or more.
Importantly, if the sum of FBMem and StolenMem (=minStolen) exceeds the capacity of DVMT Pre Allocated Memory, activation of QE/CI graphics acceleration will fail.
In other words, QE/CI graphics acceleration is available only when the following conditions are satisfied.
( Stolen Mem + FB Mem ) <= DVMT Pre Allocated Memory
However, it is difficult to change the DVMT Pre Allocated Memory item in the BIOS settings of these days laptops.
So, in the past, people usually extracted the Setup_var value of DVMT Pre Allocated Memory from the BIOS update file and changed it directly.
But, this can be solved by checking the DVMT 32 MB pre-allocation item in Hackintool.
By the way, the DVMT 32 MB preallocated patch provided by Hackintool works well up to AppleIntelCFLGraphicsFramebuffer.kext.
However, in my opinion, it doesn't seem to fit well in AppleIntelICLLPGraphicsFramebuffer.kext.
So, you can try modifying the framebuffer-fbmem and framebuffer-stolenmem of PciRoot(0x0)/Pci(0x2,0x0) directly.
This is to slightly increase the capacity of the framebuffer-stolenmem while not allowing (Stolen Mem + FB Mem) to exceed DVMT Pre Allocated Memory.
For more information on StolenMem and FBMem, you may want to refer to the sites below.
Video RAM information of Framebuffer corresponding to 0x8A520000 is as follows.
- StolenMem : 64 MB
- FBMem : 0 Bytes
ID: 8A520000, STOLEN: 64 MB, FBMEM: 0 bytes, VRAM: 1536 MB, Flags: 0x00008305
TOTAL STOLEN: 193 MB?, TOTAL CURSOR: 1 MB (1572864 bytes), MAX STOLEN: 193 MB, MAX OVERALL: 194 MB (203972608 bytes)
Model name: Intel HD Graphics ICL RVP
Camellia: CamelliaDisabled (0), Freq: 0 Hz, FreqMax: 0 Hz
Mobile: 1, PipeCount: 3, PortCount: 6, FBMemoryCount: 3
[0] busId: 0x00, pipe: 0, type: 0x00000002, flags: 0x00000018 - ConnectorLVDS
[1] busId: 0x02, pipe: 1, type: 0x00000400, flags: 0x00000281 - ConnectorDP
[2] busId: 0x09, pipe: 1, type: 0x00000400, flags: 0x00000281 - ConnectorDP
[3] busId: 0x0A, pipe: 1, type: 0x00000400, flags: 0x00000281 - ConnectorDP
[4] busId: 0x0B, pipe: 1, type: 0x00000400, flags: 0x00000281 - ConnectorDP
[5] busId: 0x0C, pipe: 1, type: 0x00000400, flags: 0x00000281 - ConnectorDP
00000000 00000000 00000000 00000000 02000000 18000000
01000000 02000000 01000000 00000000 00040000 81020000
02000000 09000000 01000000 01000000 00040000 81020000
03000000 0A000000 01000000 01000000 00040000 81020000
04000000 0B000000 01000000 01000000 00040000 81020000
05000000 0C000000 01000000 01000000 00040000 81020000
https://github.com/acidanthera/WhateverGreen/blob/master/Manual/FAQ.IntelHD.en.md
In the Config.plist of the EFI folder that I gave you last time, Properties are entered as follows.
It is also the value of the DVMT 32 MB pre-allocated patch provided by Hackintool.
- framebuffer-fbmem: 00009000
- framebuffer-stolenmem: 00003001
When entering the Properties in DATA format in Config.plist, you must enter Reverse Byte Order.
https://x86.co.kr/qa/4434100#comment_4434378
According to Reverse Byte Order, 00003001 is 0x01300000.
And, here you should notice the second and third digits after the English alphabet lowercase x, and you can see that it is 13.
13 is a hexadecimal, so converting to decimal is 19, which means StolenMem is 19 MB.
Likewise, FBMem is 9 MB, but framebuffer-fbmem doesn't seem to need to be modified.
To slightly increase the capacity of StolenMem, modify framebuffer-stolenmem to 00000003.
According to Reverse Byte Order, 00000003 is 0x03000000.
And, here you should notice the second and third digits after the lowercase letter x in the English alphabet and see that it is 30.
30 is hexadecimal, so converting to decimal is 48, which means StolenMem is 48 MB.
Then, ( 48 + 9 = 57 ) <= DVMT Pre Allocated Memory is satisfied and the StolenMem capacity is changed to 48 MB which is slightly higher.
I changed the framebuffer-stolenmem to 00000003 in Config.plist.
Replace with the Config.plist below and try rebooting.
Previously, I gave a Config.plist with properties of framebuffer-fbmem: 00009000 and framebuffer-stolenmem: 00003001 applied to merong, and merong booted with that Config.plist, and a kernel panic occurred in AppleIntelICLLPGraphicsFramebuffer.kext.
However, after merging changed DVMT Pre Allocated Memory from 60 MB to 64 MB in BIOS setup, kernel panic did not occur and QE/CI graphics acceleration was activated normally.

 merong | 2020.06.28
You can also try setting the value of the DVMT Pre Allocated Memory item in the BIOS setup to a slightly higher capacity such as 128 MB, 192 MB, or 256 MB instead of 64 MB.
However, I'm not sure what the maximum DVMT Pre Allocated Memory value you can change in your laptop's BIOS settings.
If you look at the Config.plist in the EFI folder attached to KhoraLee's installation review, you can see that KhoraLee's QE/CI graphics acceleration is normally activated even without the properties of framebuffer-fbmem and framebuffer-stolenmem.
It seems that KhoraLee directly extracted the Setup_var value corresponding to the DVMT Pre Allocated Memory item in the BIOS and changed it, but I think that KhoraLee has changed it to a capacity larger than 64 MB.
https://x86.co.kr/mymac/4919509

 KhoraLee | 2020.06.27
- 한국어 버전 ( Korean Ver ) -
음... 저의 생각이 틀릴 수도 있지만, 저의 생각으로는 QE/CI 그래픽 가속 활성화가 되지 않는 문제는 DVMT 와 관련이 있는 것 같습니다.
AppleIntelICLLPGraphicsFramebuffer.kext 은 많은 변화가 있습니다.
특히, 그 변화 중 하나는 바로 Stolen Memory 가 이전의 ~ SKL/KBL/CFL Framebuffer 보다 조금 더 많은 용량을 요구하는 것입니다.
그리고, 인텔 내장 그래픽의 QE/CI 그래픽 가속을 활성화하는 과정에서 중요한 것은 DVMT Pre Allocated Memory 를 64 MB 이상으로 설정하는 것입니다.
중요한 점은 FBMem 과 StolenMem (=minStolen) 의 합이 DVMT Pre Allocated Memory 의 용량을 초과하면 QE/CI 그래픽 가속의 활성화에 실패하게 됩니다.
즉, 다음과 같은 조건이 만족되어야 QE/CI 그래픽 가속 활성화가 가능합니다.
( Stolen Mem + FB Mem ) <= DVMT Pre Allocated Memory
하지만, 요즘 노트북의 BIOS 설정에는 DVMT Pre Allocated Memory 항목이 숨겨져 있어서 변경하기가 어렵습니다.
그래서, 예전에는 BIOS 업데이트 파일에서 DVMT Pre Allocated Memory 항목의 Setup_var 값을 추출해서 직접 변경했었지만
Hackintool 에서 DVMT 32 MB 사전 할당 항목에 체크하면 해결할 수 있습니다.
그런데, Hackintool 에서 제공하는 DVMT 32 MB 사전 할당 패치가AppleIntelCFLGraphicsFramebuffer.kext 까지는 잘 적용됩니다.
하지만, 저의 생각으로는 이 패치가 AppleIntelICLLPGraphicsFramebuffer.kext 에서는 잘 맞지 않는 것 같습니다.
그래서, PciRoot(0x0)/Pci(0x2,0x0) 의 framebuffer-fbmem 과 framebuffer-stolenmem 를 직접 수정해보는 방법을 시도해볼 수 있습니다.
( Stolen Mem + FB Mem ) 가 DVMT Pre Allocated Memory 를 초과하지 않으면서 framebuffer-stolenmem 의 용량을 조금 높이는 것입니다.
StolenMem 과 FBMem 에 대한 자세한 내용은 아래의 사이트를 참고하면 좋을 것 같습니다.
0x8A520000 에 해당하는 Framebuffer 의 Video RAM 정보는 다음과 같습니다.
- StolenMem : 64 MB
- FBMem : 0 Bytes
ID: 8A520000, STOLEN: 64 MB, FBMEM: 0 bytes, VRAM: 1536 MB, Flags: 0x00008305
TOTAL STOLEN: 193 MB?, TOTAL CURSOR: 1 MB (1572864 bytes), MAX STOLEN: 193 MB, MAX OVERALL: 194 MB (203972608 bytes)
Model name: Intel HD Graphics ICL RVP
Camellia: CamelliaDisabled (0), Freq: 0 Hz, FreqMax: 0 Hz
Mobile: 1, PipeCount: 3, PortCount: 6, FBMemoryCount: 3
[0] busId: 0x00, pipe: 0, type: 0x00000002, flags: 0x00000018 - ConnectorLVDS
[1] busId: 0x02, pipe: 1, type: 0x00000400, flags: 0x00000281 - ConnectorDP
[2] busId: 0x09, pipe: 1, type: 0x00000400, flags: 0x00000281 - ConnectorDP
[3] busId: 0x0A, pipe: 1, type: 0x00000400, flags: 0x00000281 - ConnectorDP
[4] busId: 0x0B, pipe: 1, type: 0x00000400, flags: 0x00000281 - ConnectorDP
[5] busId: 0x0C, pipe: 1, type: 0x00000400, flags: 0x00000281 - ConnectorDP
00000000 00000000 00000000 00000000 02000000 18000000
01000000 02000000 01000000 00000000 00040000 81020000
02000000 09000000 01000000 01000000 00040000 81020000
03000000 0A000000 01000000 01000000 00040000 81020000
04000000 0B000000 01000000 01000000 00040000 81020000
05000000 0C000000 01000000 01000000 00040000 81020000
https://github.com/acidanthera/WhateverGreen/blob/master/Manual/FAQ.IntelHD.en.md
제가 저번에 드린 EFI 폴더의 Config.plist 에는 Properties 가 다음과 같이 입력되어 있습니다.
Hackintool 에서 기본적으로 제공하는 DVMT 32 MB 사전 할당 항목에 해당하는 패치의 값이기도 합니다.
- framebuffer-fbmem : 00009000
- framebuffer-stolenmem : 00003001
Config.plist 에서 Properties 를 DATA 형식으로 입력할 때 Reverse Byte Order 로 입력해야 합니다.
Reverse Byte Order 에 따르면 00003001 은 0x01300000 입니다.
그리고, 여기에서 영어 알파벳 소문자 x 뒤의 두 번째와 세 번째의 숫자를 주목해야 하며 13 인 것을 볼 수 있습니다.
13 은 16 진수 Hex 이므로 10 진수로 변환하면 19 이며 StolenMem 이 19 MB 라는 의미입니다.
마찬가지로, FBMem 은 9 MB 인데 framebuffer-fbmem 은 수정하지 않아도 될 것 같습니다.
StolenMem 의 용량을 조금 높여주기 위해서 framebuffer-stolenmem 을 00000003 으로 수정합니다.
Reverse Byte Order 에 따르면 00000003 은 0x03000000 입니다.
그리고, 여기에서 영어 알파벳 소문자 x 뒤의 두 번째와 세 번째의 숫자를 주목해야 하며 30 인 것을 볼 수 있습니다.
30 은 16 진수 Hex 이므로 진수로 변환하면 48 이며 StolenMem 이 48 MB 라는 의미입니다.
그러면, ( 48 + 9 = 57 ) <= DVMT Pre Allocated Memory 의 조건을 만족하게 되면서 StolenMem 의 용량을 조금 더 높인 48 MB 로 변경할 수 있게 됩니다.
제가 Config.plist 에서 framebuffer-stolenmem 을 00000003 으로 수정하였습니다.
아래의 Config.plist 로 교체하고 다시 부팅해보세요.
( 위의 영문 버전에서 다운로드를 해주세요. )
전에 제가 framebuffer-fbmem : 00009000 과 framebuffer-stolenmem : 00003001 라는 Properties 가 적용된 Config.plist 를 merong 님에게 드리고 merong 님은 그 Config.plist 로 부팅을 하셨는데 AppleIntelICLLPGraphicsFramebuffer.kext 에서 커널 패닉이 발생했었습니다.
그런데, merong 님이 BIOS 설정에서 DVMT Pre Allocated Memory 를 60 MB 에서 64 MB 로 변경하고 난 후에는 커널 패닉이 발생하지 않고 QE/CI 그래픽 가속도 정상적으로 활성화가 되었습니다.
BIOS 설정에서 DVMT Pre Allocated Memory 항목의 값을 64 MB 가 아닌 128 MB 이나 192 MB 또는 256 MB 등으로 조금 더 높은 용량으로 설정해보는 방법도 있습니다.
하지만, 저는 질문자님의 노트북의 BIOS 설정에서 변경할 수 있는 최대의 DVMT Pre Allocated Memory 값이 어느 정도일 지는 저도 잘 모르겠습니다.
KhoraLee 님의 설치 후기글에 첨부되어 있는 EFI 폴더에서 Config.plist 를 보면 KhoraLee 님은 framebuffer-fbmem 와 framebuffer-stolenmem 라는 Properties 가 없어도 정상적으로 QE/CI 그래픽 가속 활성화가 된 것을 볼 수 있습니다.
KhoraLee 님은 BIOS 의 DVMT Pre Allocated Memory 항목에 해당하는 Setup_var 값을 직접 추출해서 변경한 작업을 한 것으로 보이는데 아마도 KhoraLee 님은 64 MB 보다 더 큰 용량으로 변경한 것 같은 생각이 듭니다.
shl628
이 가설이 맞습니다. 64mb 이상으로 설정해야 정상적으로 부팅됩니다. stolenmem은 아무리 해도 패치가 안먹습니다.
shl628
I have set it to 64M before you send to me. Just now I set it to 96M but it will still be panic! Maybe 1065G7 can't be driven now, I will give feedback to the same 1035G4 devices around me, let them match and see if it can be driven!
앤드류우
In addition to 0x8A520000, there are 0x8A520001 and 0x8A520002 as Platform IDs of 0x8A52 Device corresponding to Intel Iris Plus Graphics G7 built-in graphics of i7-1065G7.
I tried changing the Platform ID to 0x8A520001 instead of 0x8A520000.
Replace with the Config.plist below and try rebooting.
If the same error occurs, try booting with the Config.plist below.
shl628
Both are still the same as before, maybe only until acidanthera updates whatevergreen!
앤드류우
I'm sorry, but I'm not sure either.
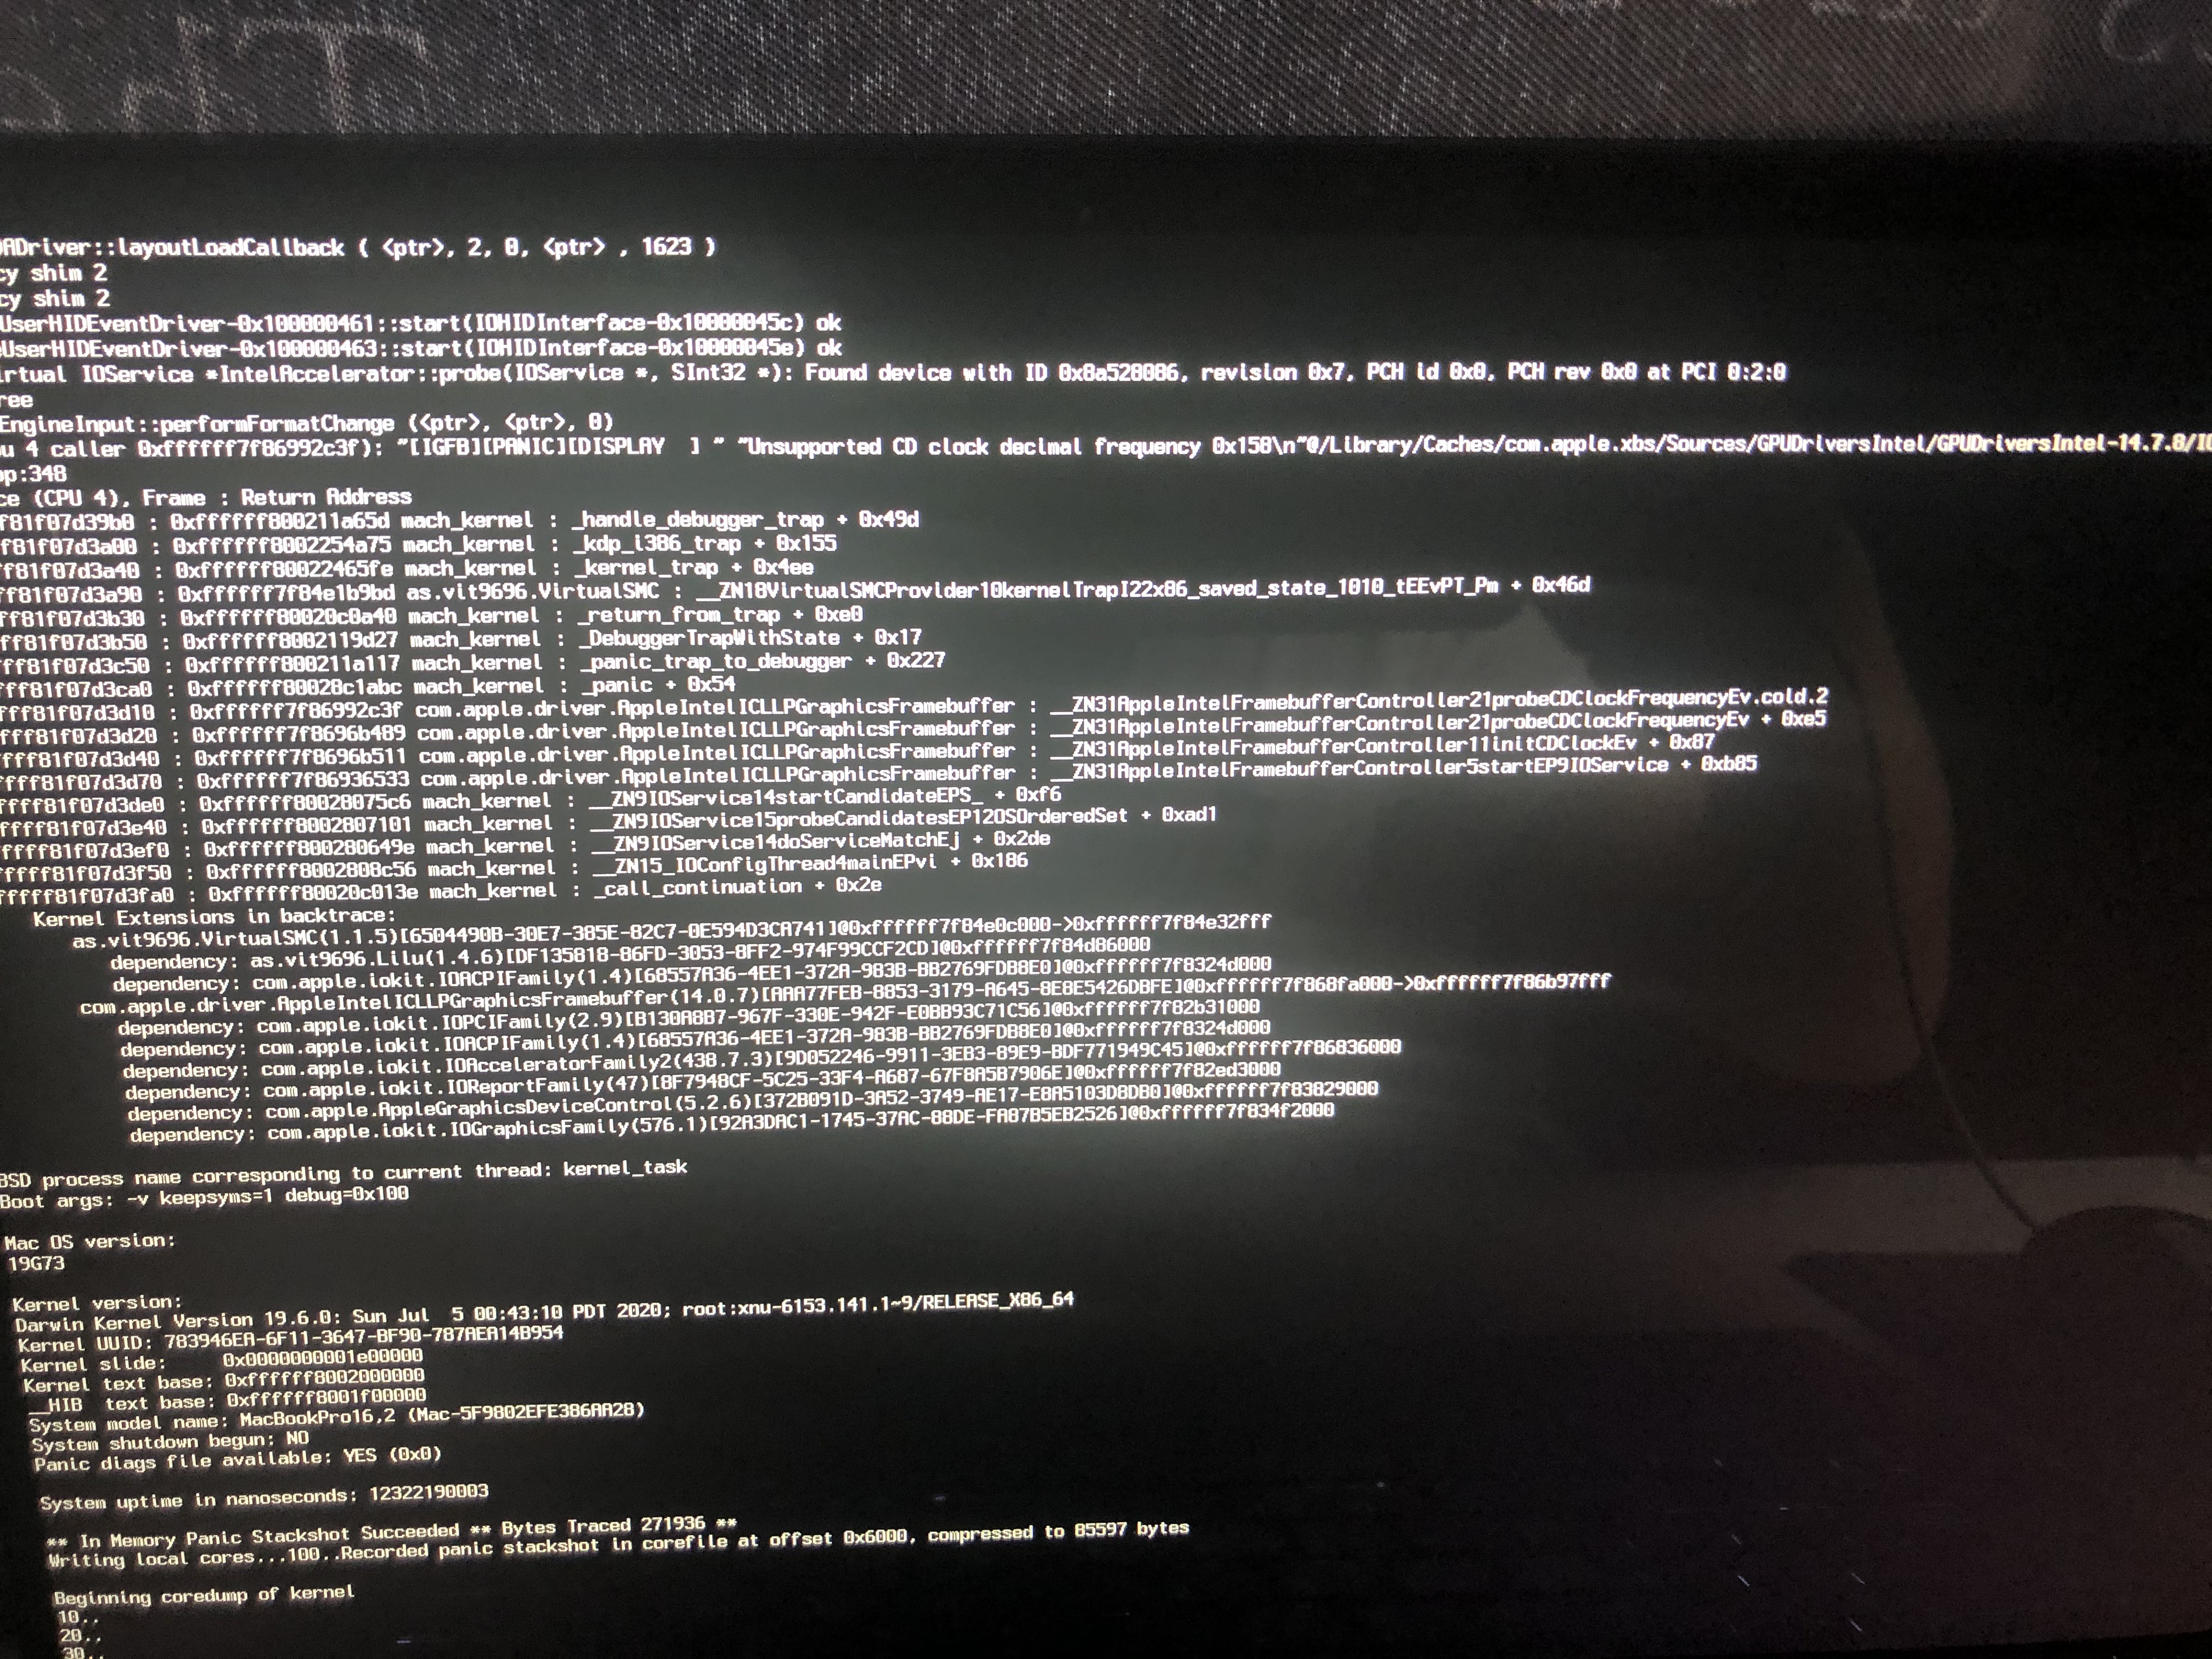
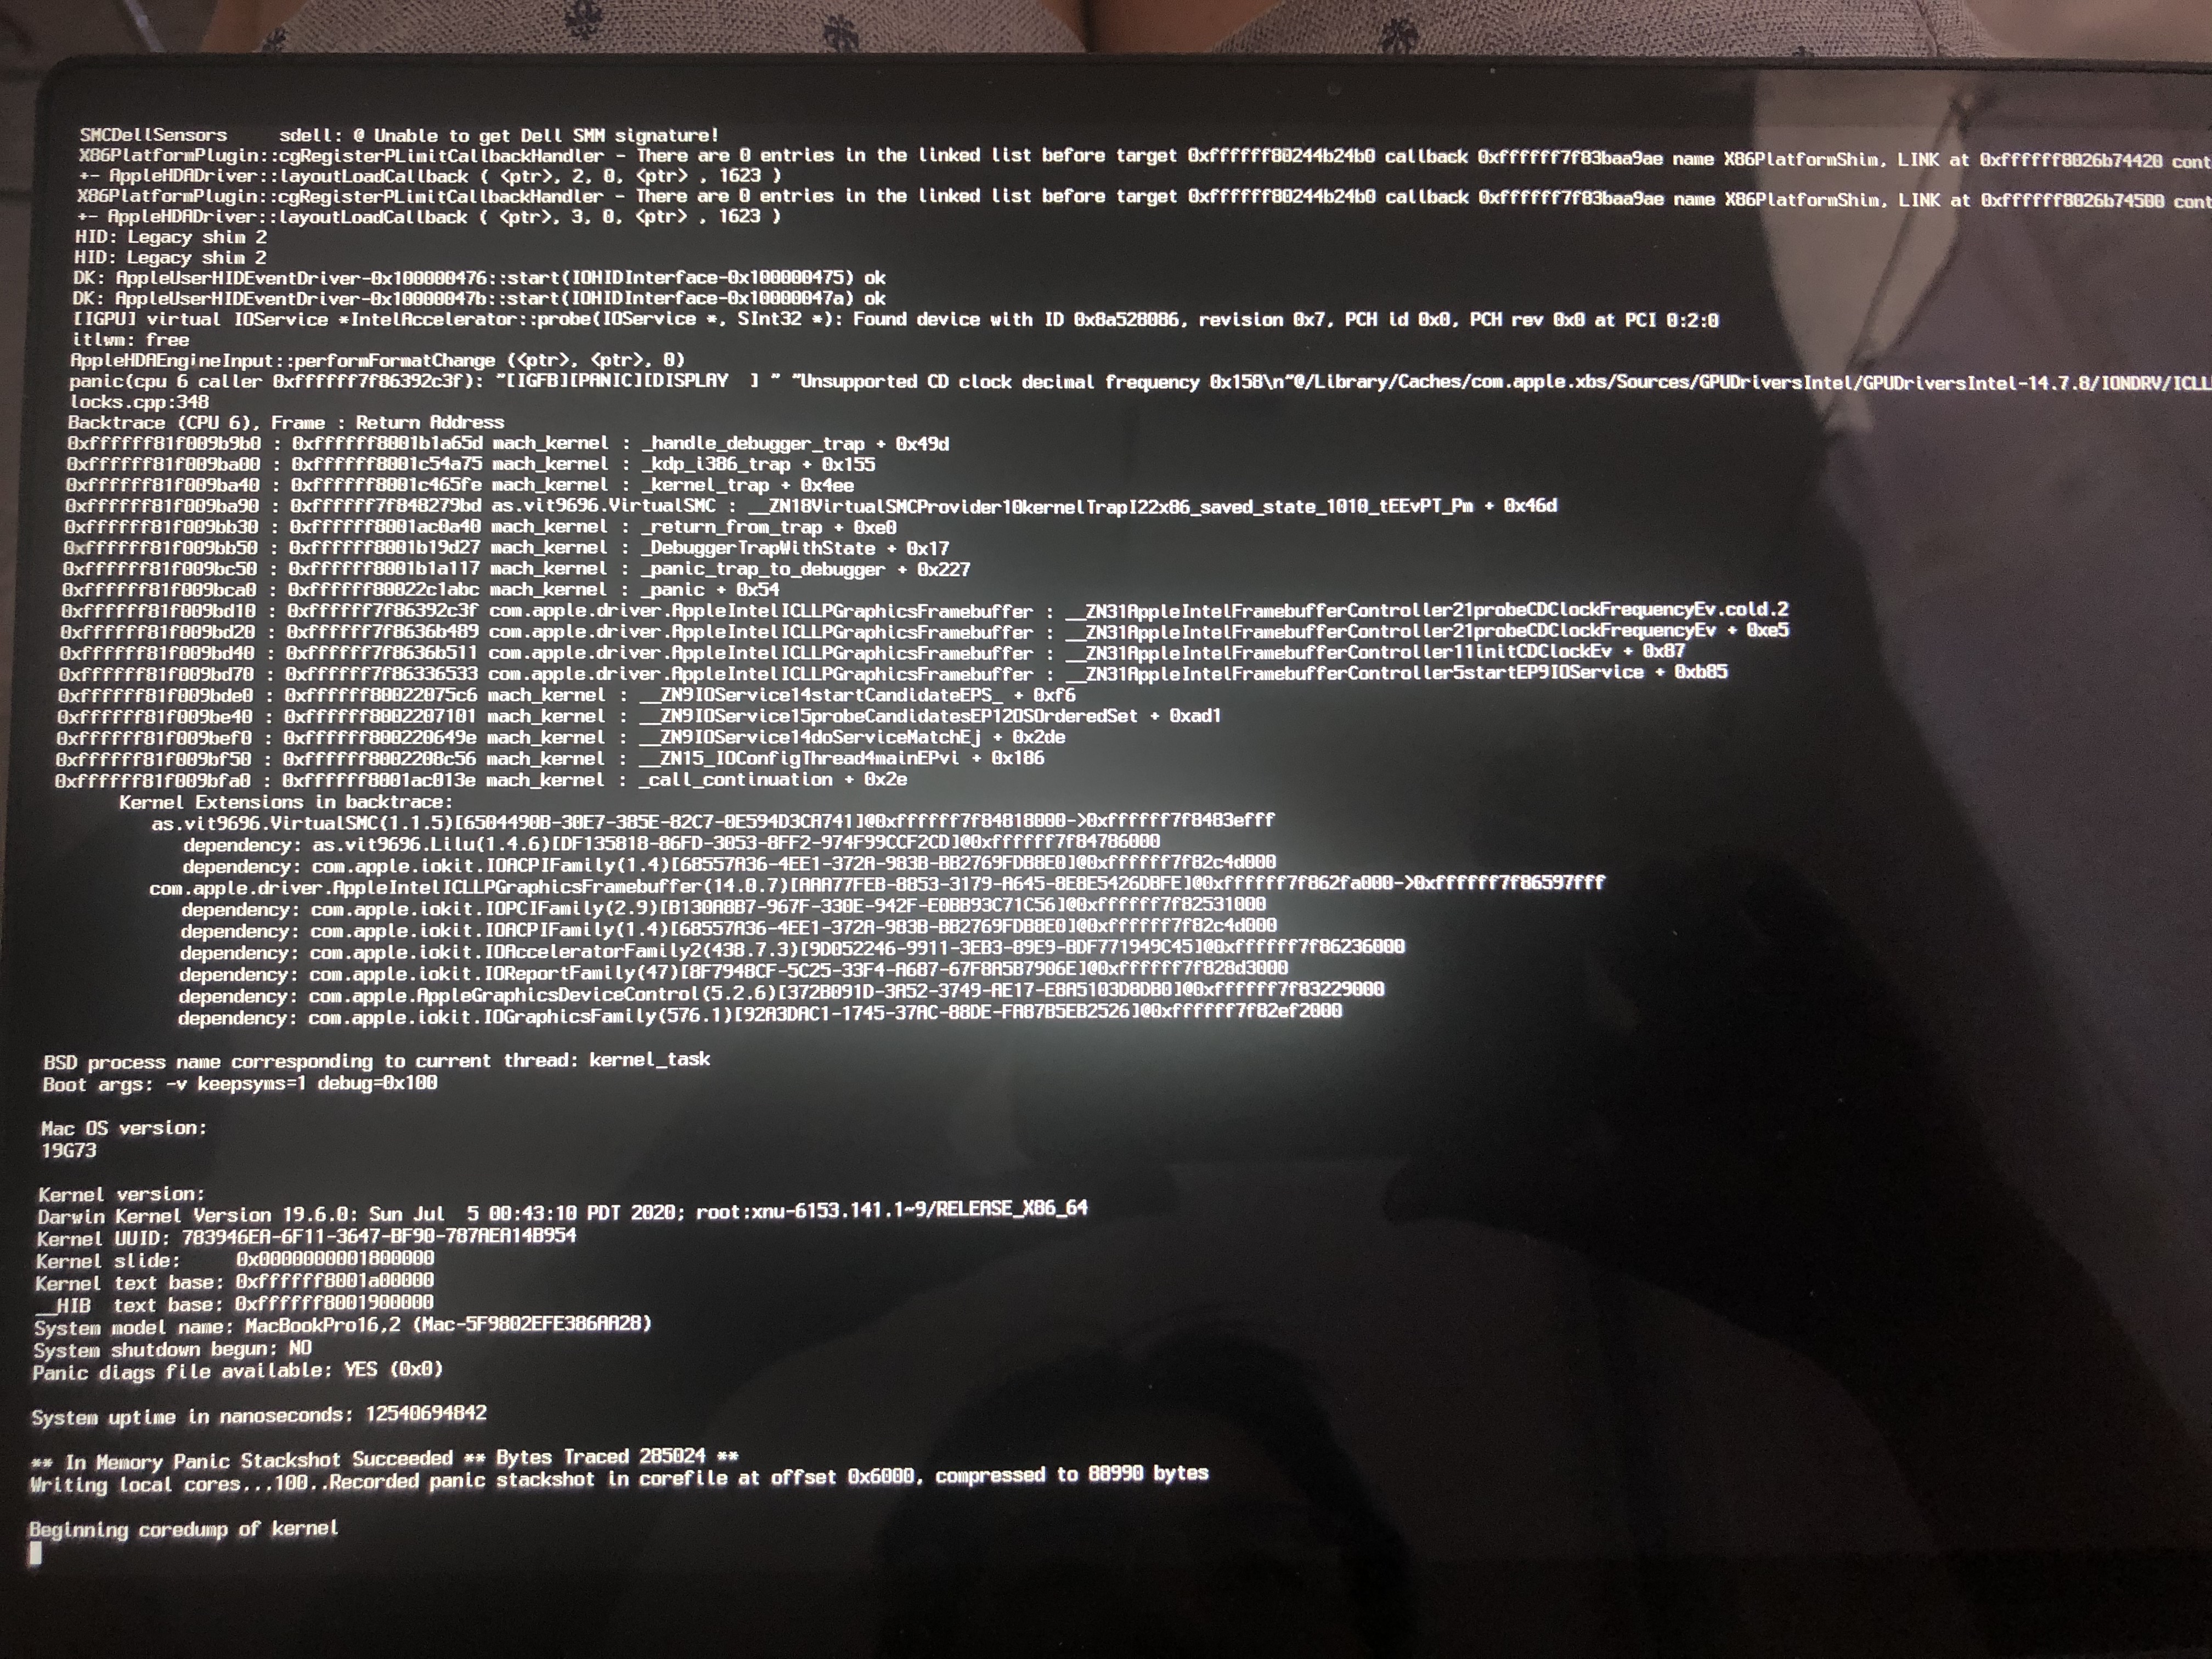
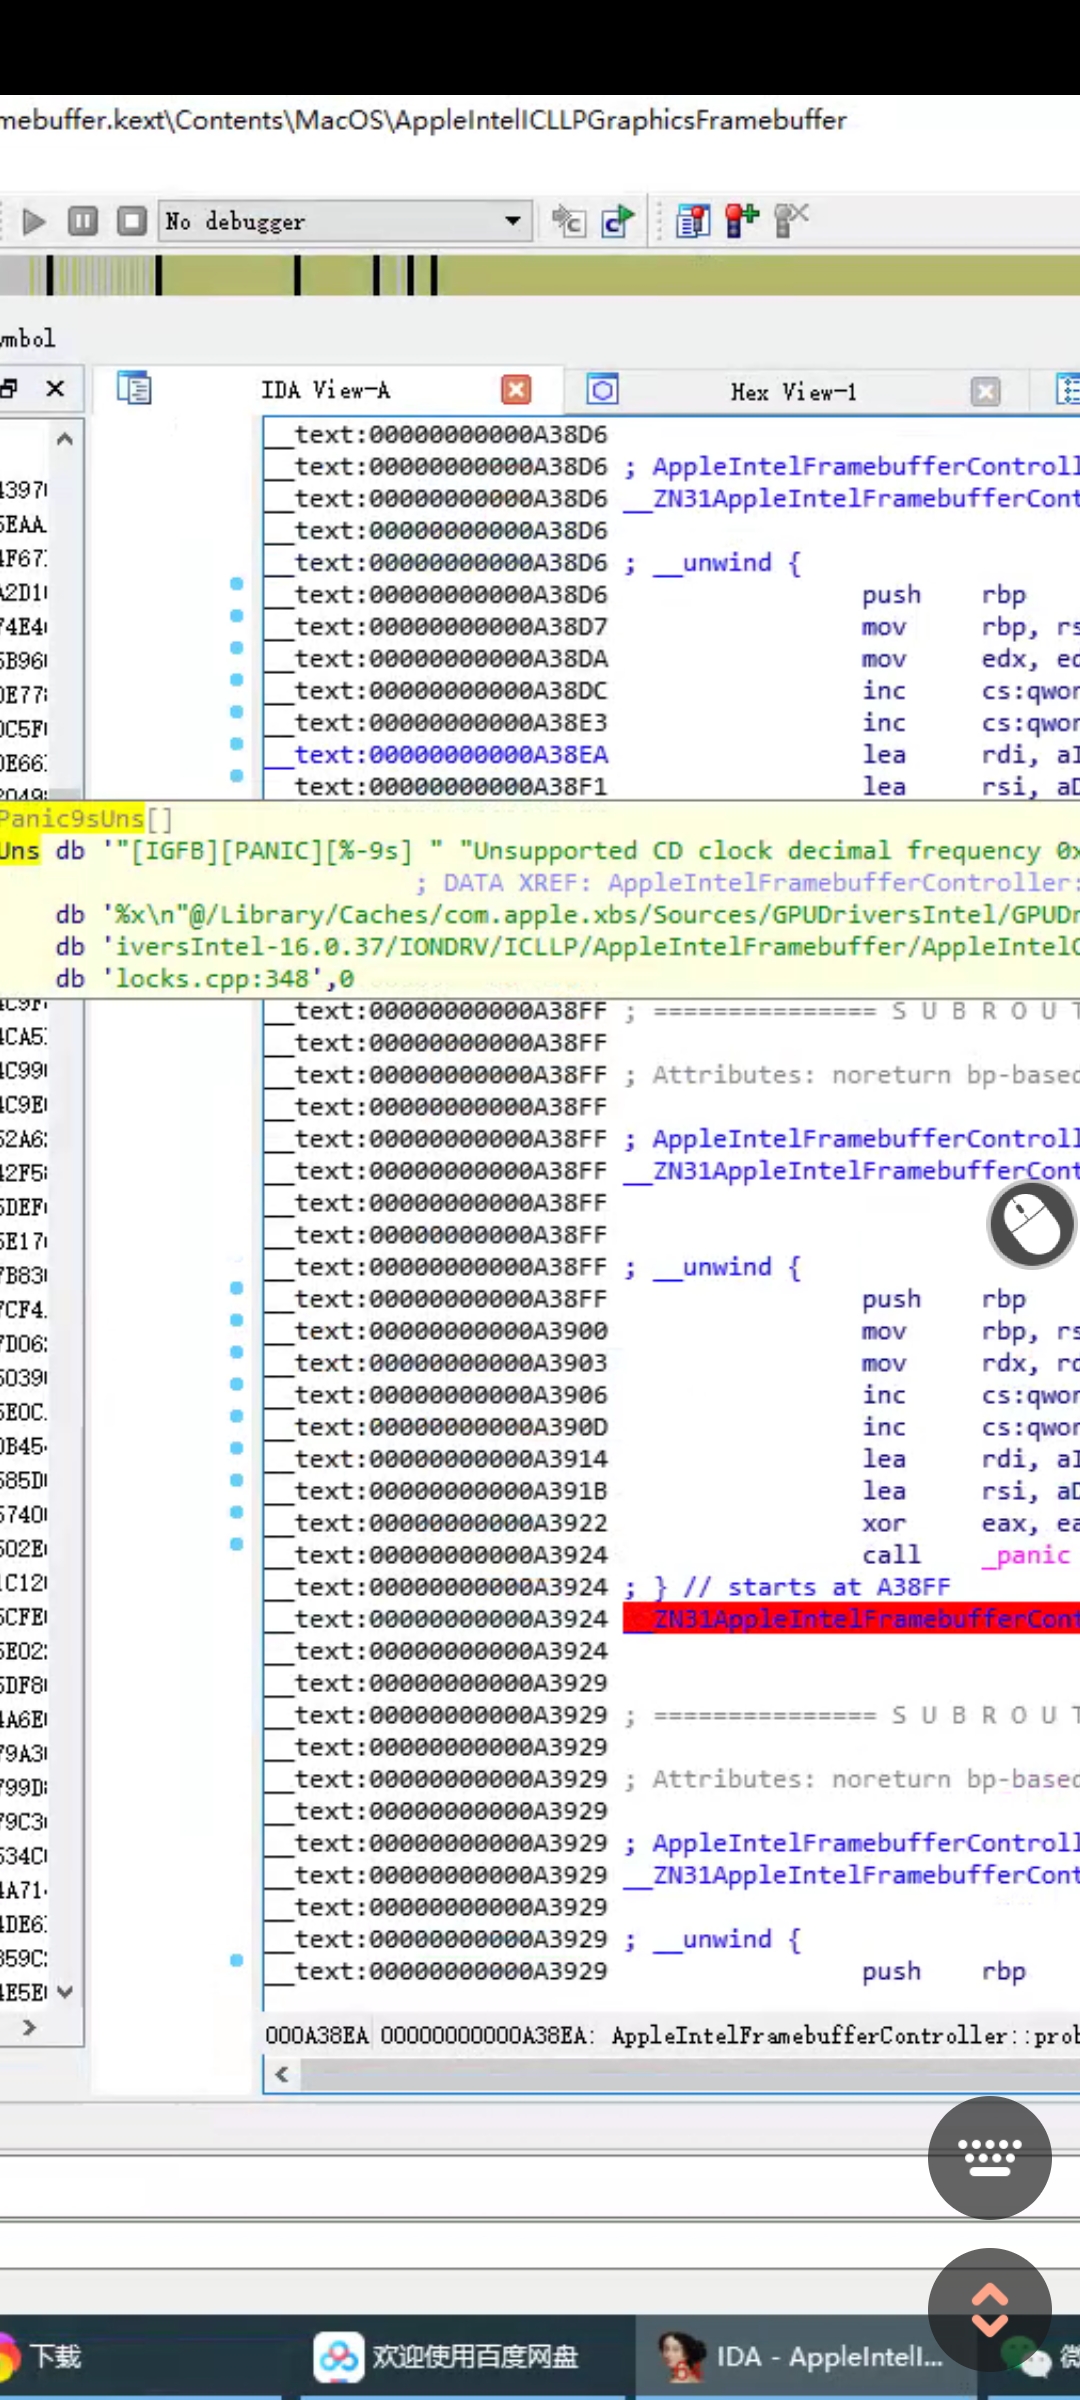
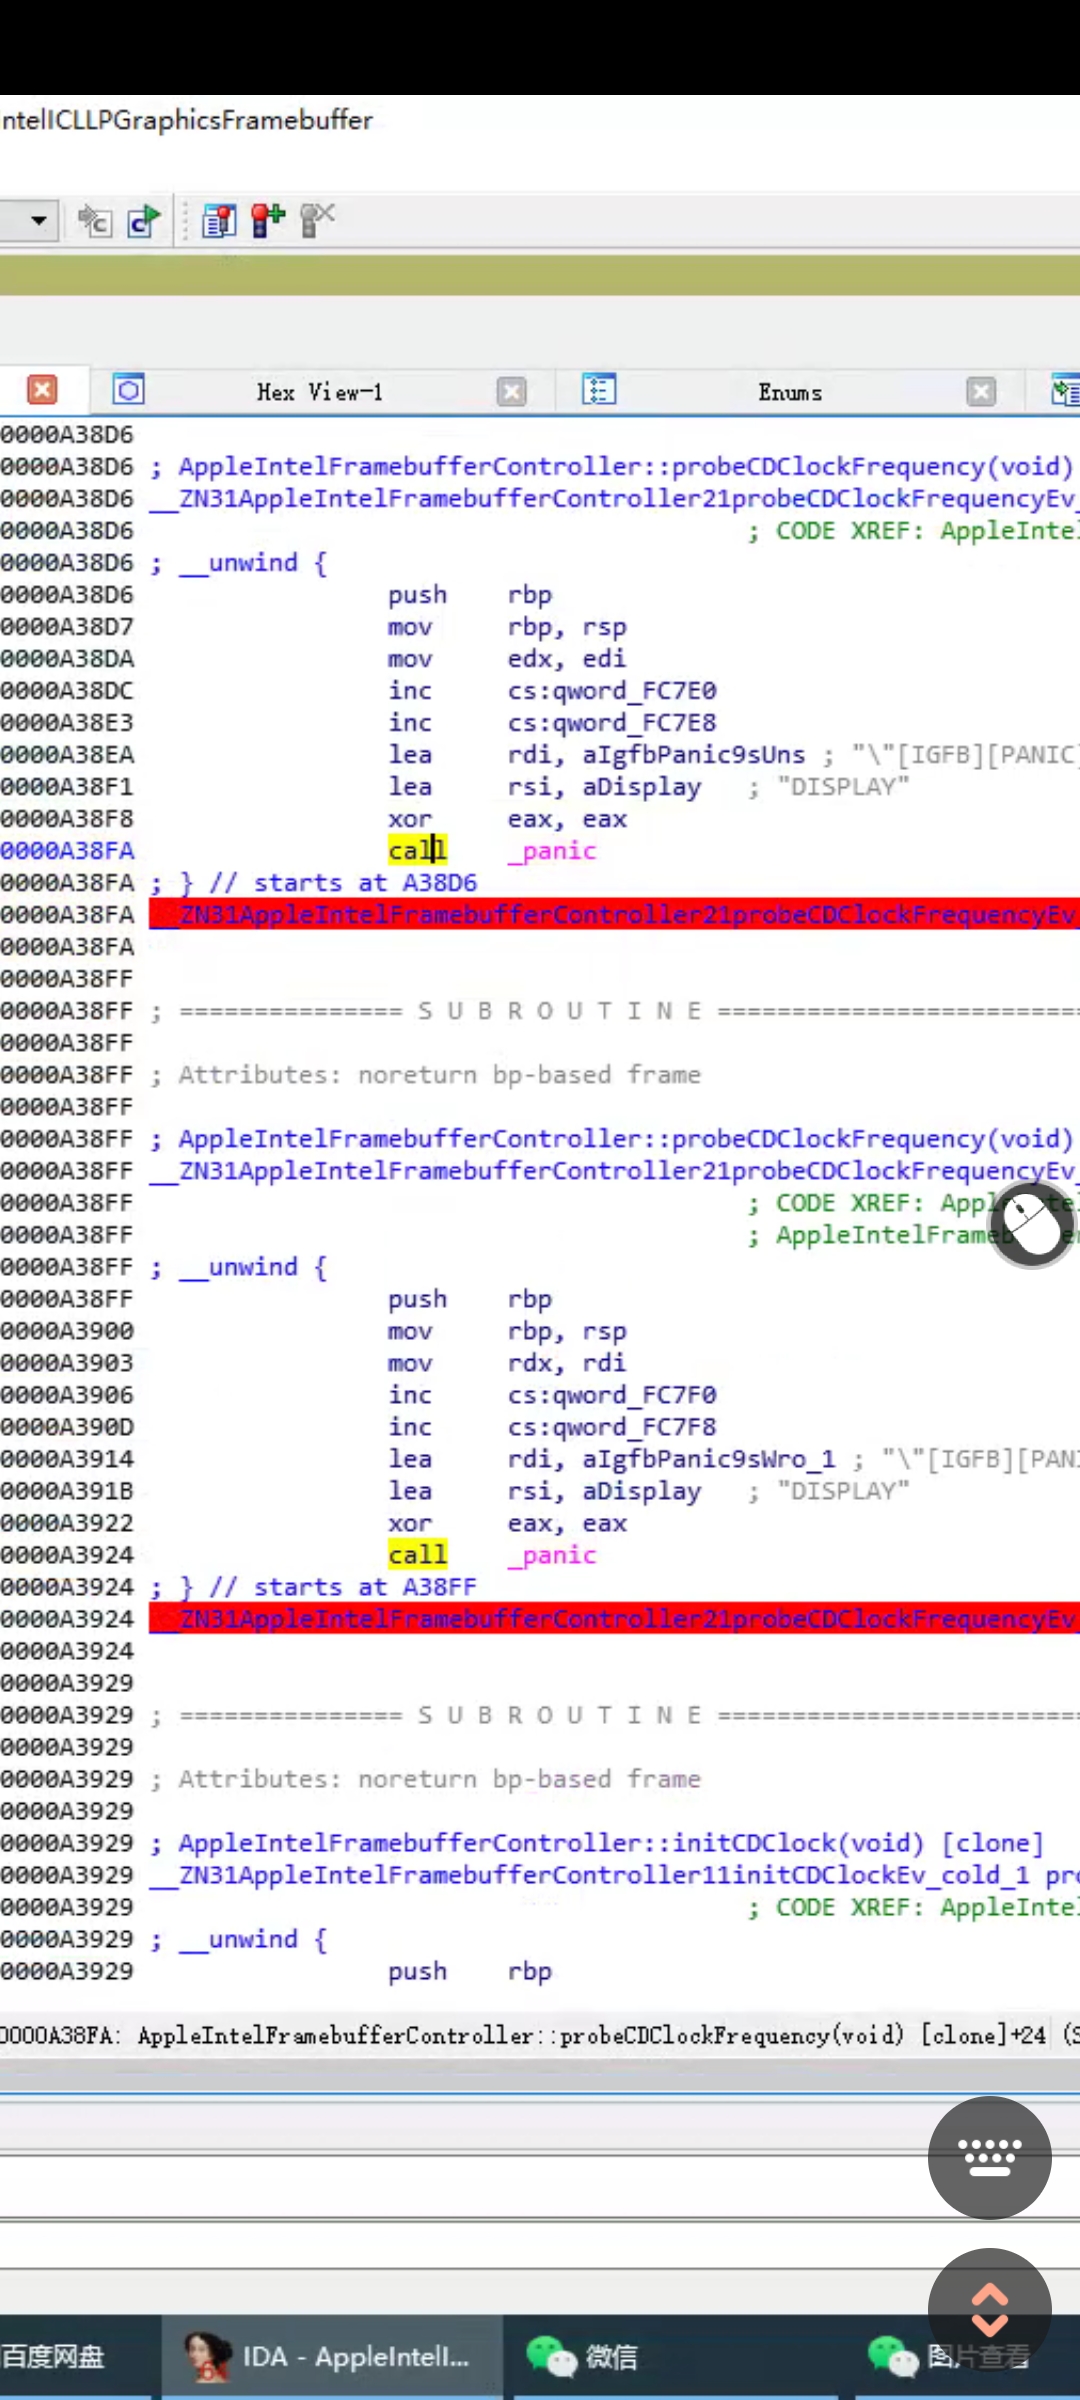
But, you can see Unsupported CD Clock decimal frequency in the log where Kernel Panic occurred.
There is an item related to CD Clock Frequency in BIOS setup.
You can try changing the CD Clock Frequency, but the Insanelymac site above says that changing the CD Clock Frequency will cause the same kernel panic as before.
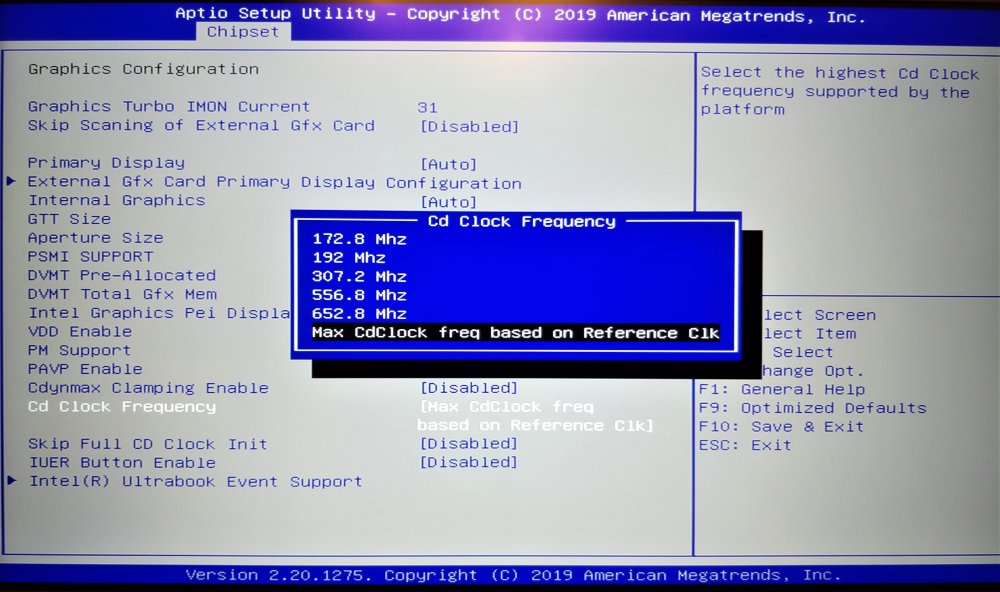
Image source - Insanelymac
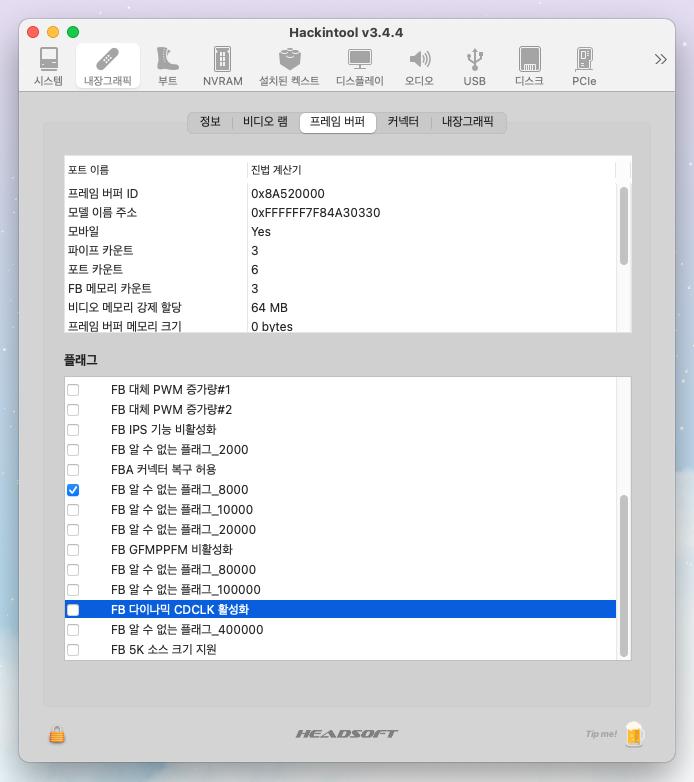
You can see the settings related to CDCLK in Hackintool's flag setting, but I am not sure if it is related to this.
An example of a kernel panic related to Ice Lake's graphics was also posted on Github's Issue.
https://github.com/acidanthera/bugtracker/issues/832
https://github.com/acidanthera/bugtracker/issues/855
https://github.com/acidanthera/bugtracker/issues/942
shl628
Our problem may be here. Someone of us has extracted the AppleIntelICLLPGraphicsFramebuffer.kext driver of icl and found that the cd clock error may be related to this. Do you have any suggestions?
앤드류우
I checked the flag item related to CDCLK in Hackintool.
And, unlike the previous ~ SKL/KBL/CFL Framebuffer, the FBFramebuffer common memory item is not checked, so I checked it to see if it is related to DVMT.
Then, the Flags value will be 0x00208307.
And, to apply the modified Flags, one more item is added to Properties.
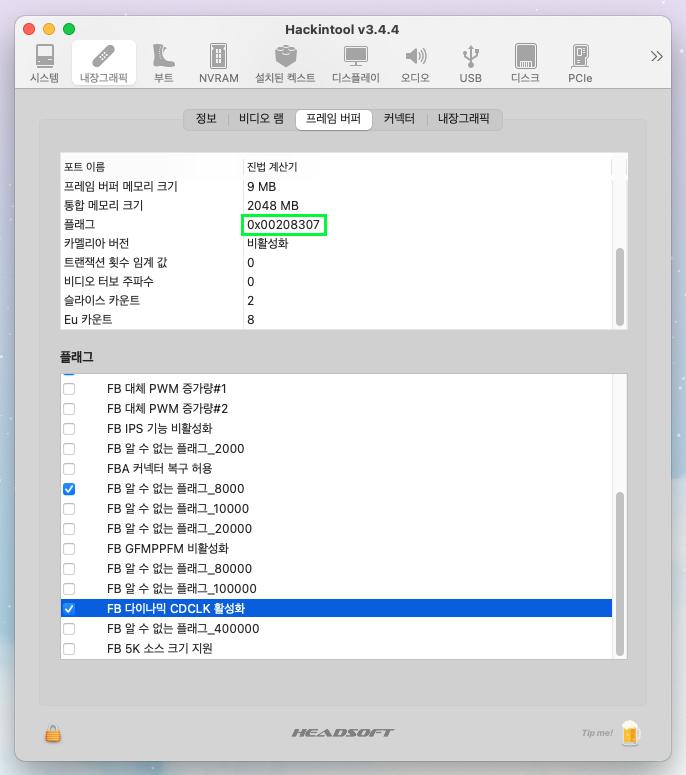
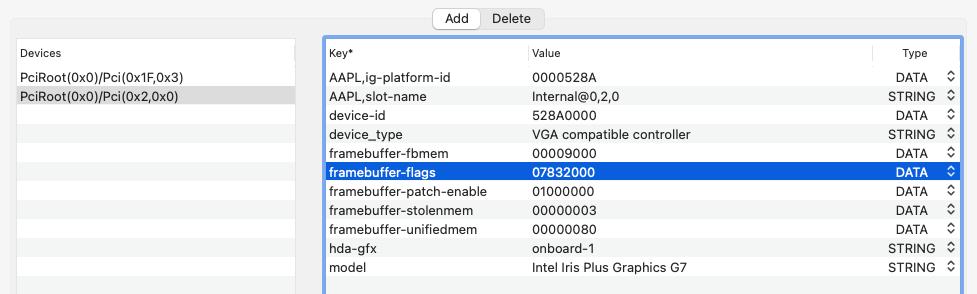
Replace it with the Config below and try rebooting.
Of course, DVMT Pre Allocated Memory must be set to 64 MB or higher in BIOS.
If a kernel panic occurs without booting even with the Config attached above,
try rebooting with the Config below, modifying the framebuffer-flags value to 06832000.
This is the value of Flags that unchecked the FBAvoidFastLinkTraining item.
If the boot still fails and kernel panic occurs, sorry, but I don't know anymore.

shl628
감사합니다. 마침 같은보드랑 7700 씨퓨를 얻을수 있어서 많은 도움이 되었습니다.
5700xt라 부트로그만 살짝 수정해주니 바로 원래쓰던 15.6에 efi만 교환하여 사용할수 있었습니다.
추천 드립니다.
5700xt라 부트로그만 살짝 수정해주니 바로 원래쓰던 15.6에 efi만 교환하여 사용할수 있었습니다.
추천 드립니다.
shl628
Thanks, with the help of a very good person, we successfully driven
앤드류우
Wow, that's great news.
I'm glad you were successful. :)

shl628
shl628님이 아래 댓글에서 이 글을 참조 하였습니다.
❝Intel I7-1065G7 그래픽 가속 문제 해결 하신분 계신가요??❞
❝Intel I7-1065G7 그래픽 가속 문제 해결 하신분 계신가요??❞
shl628
제 시스템도 7100에 B250m-ds3h HD630 입니다
문제가 설치 화면 진입할때 화면이 블랙아웃됩니다
다른 클로버 세팅으로 겨우 설치하고 부팅화면 진입하려는데도 여전히 블랙아웃인데.. 뭘 살펴봐야 할까요??
시끄러워
혹시, SMBIOS 를 어떤 모델로 설정하셨는지 알려주실 수 있나요?
저는 Intel HD Graphics 630 내장 그래픽만 단독으로 사용하고 있는데
Mac OS Mojave 10.14 버전부터는 SMBIOS 가 iMac 18,x 모델로 설정되어 있으면
Black Out 증상이 발생하여 iMac 17,1 로 설정하여 사용하고 있습니다.
본 설치 후기글에 첨부된 EFI 폴더에 포함되어 있는 Config.plist 에서 SMBIOS 는 iMac 17,1 로 설정되어 있습니다.
shl628
답글 감사드립니다!
630내장만 이용중이구요
SMBIOS는 EFI에 해주신대로 17,1로 하여서 부팅하여도 블랙아웃이고
Graphic Injector메뉴에서 InjectIntel 체크 후 faked, platform-id 0x12345678 입력해서 부팅하면
IGPU Graphics driver failed to load : could not register with frame buffer driver!
나오고 멈춥니다 ㅠ
630내장만 이용중이구요
SMBIOS는 EFI에 해주신대로 17,1로 하여서 부팅하여도 블랙아웃이고
Graphic Injector메뉴에서 InjectIntel 체크 후 faked, platform-id 0x12345678 입력해서 부팅하면
IGPU Graphics driver failed to load : could not register with frame buffer driver!
나오고 멈춥니다 ㅠ
시끄러워
장장 3시간만에 해결했습니다 ㅎㅎ
가지고 있는 GTX650구형을 연결하니 부팅이 되더라구요
그래서 내장 그래픽 을 다시 잡고 AGPMInjector.kext 을 지우니 아주 잘 됩니다
감사합니다!
가지고 있는 GTX650구형을 연결하니 부팅이 되더라구요
그래서 내장 그래픽 을 다시 잡고 AGPMInjector.kext 을 지우니 아주 잘 됩니다
감사합니다!
bsiugr
일부 Kext 와 ACPI 및 SSDT 설정 관련 부분은 수정이 필요할 수도 있습니다.
그리고, 저는 Mac OS Big Sur 11.0.1 설치하여 잘 사용하고 있습니다.
권한이 없습니다. 로그인
| 제목 | 글쓴이 | 날짜 | 조회 수 |
|---|---|---|---|
|
macOS Ventura 13.7 22H123 정식버젼 고스트 이미지 OC 1.0.1 ft: 전체 공개
+3
|
 좌절금지 좌절금지
| 24.09.1917:09 | 70 |
|
macOS Sonoma 14.7 23H124 정식버젼 고스트 이미지 OC 1.0.1 ft: 전체공개
+15
|
좌절금지
| 24.09.1723:58 | 176 |
| [중급편] 노트북 해킨 +8 |
 Stultus Stultus
| 24.07.1219:19 | 751 |
| [초급편] 문제 스스로 해결하기 +17 |
Stultus
| 24.03.2920:07 | 3531 |
| [입문편] 첫 해킨 길라잡이 +32 |
Stultus
| 24.01.1218:54 | 4296 |
| [필독 - 안정화] macOS 해킨토시 설치 후 안정화 작업 목록 및 글타래 모음 총정리 📋 +63 |
shl628
| 23.01.0913:39 | 5만 |
|
Sonoma 14.7(23H124) i9-12900, GA-Z690 Proart Creator + BCM WiFi Support
+2
|
좌절금지
| 24.09.1722:40 | 195 |
|
2020 그램 sonoma efi 15Z90N
+1
|
맥가즈아 | 24.09.1717:13 | 89 |
|
macOS Sequoia 15 설치 후기 + Bcm94360NG WiFi 작동함
|
좌절금지
| 24.09.1919:17 | 187 |
|
좌절금지
|
24.09.1919:17 | 187 | |
|
좌절금지
|
24.09.1917:09 | 70 | |
|
Stultus
|
24.09.1813:37 | 149 | |
|
좌절금지
|
24.09.1723:58 | 176 | |
|
좌절금지
|
24.09.1722:40 | 195 | |
| 맥가즈아 | 24.09.1717:13 | 89 | |
 김경석 김경석
|
24.09.1708:13 | 219 | |
| Panictosh | 24.09.1617:47 | 98 | |
 Tamy Tamy
|
24.09.1504:35 | 467 | |
|
Stultus
|
24.09.1319:18 | 436 | |
| 치토 | 24.09.1019:44 | 470 | |
 머핀X 머핀X
|
24.09.0118:13 | 393 | |
 해킨도전자 해킨도전자
|
24.09.0112:54 | 295 | |
|
머핀X
|
24.08.3115:34 | 372 | |
| 화정큐삼 | 24.08.2601:42 | 239 | |
| 하나브 | 24.08.2422:59 | 208 | |
| 화정큐삼 | 24.08.2316:25 | 247 | |
 CanBe CanBe
|
24.08.1810:56 | 329 | |
| 화정큐삼 | 24.08.1800:04 | 205 | |
| 화정큐삼 | 24.08.1722:03 | 189 | |
 jbhlyk jbhlyk
|
24.08.1710:14 | 167 | |
|
Stultus
|
24.08.1622:06 | 251 | |
| hackillious | 24.08.1511:16 | 159 | |
| 세유니 | 24.08.1421:30 | 124 | |
|
Stultus
|
24.08.1419:58 | 345 | |
 오디세이 오디세이
|
24.08.1311:26 | 271 | |
|
좌절금지
|
24.08.1115:46 | 194 | |
 티타보르 티타보르
|
24.08.1111:21 | 141 | |
|
Stultus
|
24.08.1022:46 | 183 | |
|
오디세이
|
24.08.1022:10 | 391 | |
|
jbhlyk
|
24.08.1019:05 | 127 | |
| RogerT | 24.08.0923:20 | 145 | |
|
좌절금지
|
24.08.0717:18 | 286 | |
| RogerT | 24.08.0609:17 | 115 | |
| 줌바이퍼 | 24.08.0606:14 | 458 | |
|
jbhlyk
|
24.08.0523:34 | 81 | |
 수인과윤슈 수인과윤슈
|
24.08.0521:10 | 185 | |
|
좌절금지
|
24.08.0521:08 | 838 | |
|
Stultus
|
24.08.0221:07 | 426 | |
|
Tamy
|
24.07.3019:12 | 328 | |
|
해킨도전자
|
24.07.2915:37 | 261 | |
| june119 | 24.07.2813:52 | 206 | |
|
Stultus
|
24.07.2112:43 | 245 | |
 BlueGuerrilla BlueGuerrilla
|
23.05.0502:19 | 3993 | |
|
Stultus
|
24.07.1219:19 | 751 | |
| 김태국 | 21.08.0213:10 | 3679 | |
|
Stultus
|
24.07.1122:47 | 215 | |
|
Stultus
|
24.07.1020:44 | 138 | |
|
Stultus
|
24.07.0921:44 | 137 | |
|
Stultus
|
24.07.0820:57 | 223 | |
| 의정이 | 24.07.0811:28 | 171 | |
|
Stultus
|
24.07.0721:25 | 264 | |
| bsiugr | 24.07.0604:41 | 288 | |
 애플브리크 애플브리크
|
24.07.0509:56 | 492 | |
 광호 광호
|
24.02.1715:21 | 2184 | |
| 치토 | 24.06.2723:24 | 398 | |
| talas | 24.06.2617:24 | 193 | |
| 블루사탕 | 24.06.2120:58 | 116 | |
 gtrfxdsp gtrfxdsp
|
24.06.1609:01 | 511 | |
 Mactopia Mactopia
|
24.06.1401:04 | 345 | |
|
Stultus
|
24.06.1120:40 | 726 | |
| 새콤칠리 | 24.06.1115:07 | 672 | |
|
좌절금지
|
23.02.2118:35 | 118만 | |
| Steer | 24.06.1001:11 | 275 | |
 Door Door
|
24.06.0810:09 | 155 | |
|
Tamy
|
24.06.0107:41 | 416 | |
| ssdwe346 | 24.05.2923:53 | 299 | |
 joy joy
|
24.05.2809:58 | 264 | |
| 거니 | 24.05.2601:07 | 243 | |
| RogerT | 24.05.2520:14 | 247 | |
|
좌절금지
|
24.05.1812:40 | 913 | |
 wjdgkdus wjdgkdus
|
24.05.1615:02 | 211 | |
|
Tamy
|
24.05.1417:36 | 797 | |
| 줌바이퍼 | 24.05.1002:04 | 1008 | |
| 의정이 | 24.05.0821:05 | 144 | |
| ryzen | 23.10.0921:28 | 2405 | |
| 챠니앤차니 | 24.05.0319:15 | 146 | |
| 챠니앤차니 | 24.05.0220:17 | 173 | |
| 고맹이 | 24.05.0210:00 | 635 | |
|
shl628
|
24.04.3013:54 | 1067 | |
OEM DSDT 의 내용이 메인보드의 모델마다 다르기 때문에
완전히 동일한 메인보드를 사용하는 것이 아니라면 DSDT.aml 을 삭제하고 사용해야 합니다.
하지만, OpenCore 의 EFI 폴더에 포함되어 있는 SSDT 는 SSDT-MATHLDR2_STA.aml 을 제외하고
거의 Injection 방식의 ACPI 패치라서 그대로 사용할 수 있습니다.
SSDT-MATHLDR2_STA.aml 는 OEM DSDT 에서 MATH 와 LDR2 라는 Device 가 존재하는지 확인하고
MATH 와 LDR2 라는 Device 가 존재한다면 ACPI Rename 패치와 같이 적용하면 됩니다.
그런데, 아마 Gigabyte 의 GA-H110M-H 메인보드에도 9개의 SSDT 모두 사용할 수 있을 거예요.